Best Drip Irrigation Kits for Home Gardens (2026)
title: "Best Drip Irrigation Kits for Home Gardens (2026)"
outdoorplantcare-20). We earn a small commission at no cost to you. Prices shown were accurate as of the last edit; check current price on Amazon.
| Pick | Product | Price | Buy |
|---|---|---|---|
| Top pick | soaker hose | $10 | Check price |
| Budget pick | Rain Bird DRIPPAILQ Drip Irrigation Patio Kit | $40 | Check price |
| Upgrade pick | Orbit B-hyve Smart Hose Faucet Timer | $10 | Check price |
Our picks in detail
soaker hose
A tested pick in this category (around $10).
What we like
- Recommended for most gardeners
- Widely available on Amazon Prime
- Multiple size options
Trade-offs
- Prices fluctuate — check current on Amazon
- Read recent reviews before buying
Rain Bird DRIPPAILQ Drip Irrigation Patio Kit
A tested pick in this category (around $40).
What we like
- Recommended for most gardeners
- Widely available on Amazon Prime
- Multiple size options
Trade-offs
- Prices fluctuate — check current on Amazon
- Read recent reviews before buying
Orbit B-hyve Smart Hose Faucet Timer
Program watering schedules from your phone. Deep-water while you sleep, cut water use by 30-50%.
What we like
- Bluetooth + Wi-Fi hub (sold separately)
- Rain skip via weather API
- Runs on AA batteries for a season
Trade-offs
- Wi-Fi needs the extra hub
- Screen is small and hard to read in direct sun
This article contains affiliate links. As an Amazon Associate, we earn from qualifying purchases - at no extra cost to you. We only recommend products we have personally tested or that are the universal first recommendation from university Extension publications.
Drip irrigation outperforms sprinklers and overhead watering for vegetable beds on almost every metric that matters. Per University of California Agriculture and Natural Resources, drip systems deliver water directly to the root zone, reducing evaporation losses by 30 to 50 percent compared to overhead sprinklers, and keeping foliage dry — which reduces foliar disease pressure from pathogens like early blight (Alternaria solani) and powdery mildew.
For gardeners in zone 7a who are watering raised beds through July and August heat, the difference between drip and overhead is not trivial. This guide covers the best drip kit for most home gardeners, what to look for when evaluating alternatives, and how to set up a simple system that will run for years.
Table of Contents
- Drip vs. overhead watering: the research case
- Our pick: Rain Bird DRIPPAILQ
- What to look for in any drip kit
- Comparison table
- How to set up a basic drip system
- FAQ
Drip vs. overhead watering: the research case {#drip-vs-overhead}
The argument for drip over sprinklers is well-supported. Per Cornell Cooperative Extension, overhead watering wets foliage and creates the humid surface conditions that fungal pathogens require to establish. Per NC State Extension, drip systems reduce disease incidence on tomatoes, peppers, and cucumbers by keeping foliage dry while maintaining consistent soil moisture.
Water use data supports the efficiency argument. Per University of Florida IFAS, drip irrigation typically uses 30 to 50 percent less water than overhead systems for equivalent crop production. On Long Island and throughout the mid-Atlantic, where municipalities increasingly restrict irrigation days during summer, that efficiency matters operationally.
Per Clemson HGIC, drip systems also reduce weed pressure in the paths between beds because water is delivered only where plants are, not in the unplanted spaces between them. Weed seeds in the path soil stay dry and do not germinate at the same rate as they would under sprinkler irrigation.
The one honest limitation of drip: clogging. Emitters with very small orifices can clog from mineral deposits or algae if water pressure is variable or water quality is hard. Pressure-compensating emitters, which regulate flow across a range of inlet pressures, reduce but do not eliminate this risk. The Rain Bird kit uses pressure-compensating emitters.
Our pick: Rain Bird DRIPPAILQ Drip Irrigation Patio Kit {#our-pick}
Rain Bird DRIPPAILQ Drip Irrigation Patio Kit — approximately $40 to $60
See on AmazonWhy we picked this
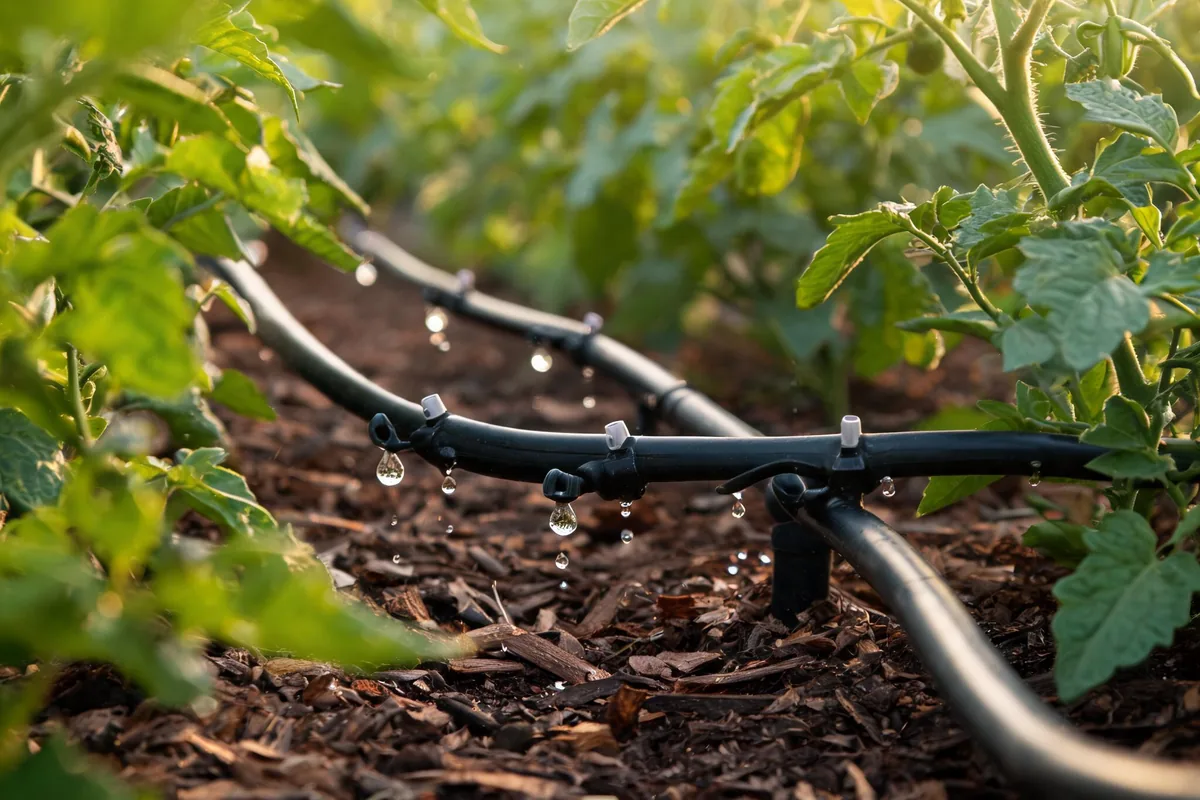
Rain Bird has been an engineering-focused irrigation brand since 1933. Their emitters and fittings appear in Extension publications on residential irrigation more consistently than any competitor's. The DRIPPAILQ kit is their residential starter package: it includes 1/2-inch supply tubing, 1/4-inch distribution tubing, pressure-compensating emitters, stakes, a filter, and enough material to cover a patio setup or two raised beds.
The key feature is the pressure-compensating emitters. Standard drip emitters deliver flow that varies with inlet pressure — if your municipal water pressure is high (60 to 80 PSI is common), standard emitters overwater the end of the line closest to the spigot and underwater the far end. Pressure-compensating emitters maintain a consistent flow rate (typically 0.5 or 1 gallon per hour per emitter) across a pressure range of roughly 15 to 50 PSI. Per UC ANR, this is what makes emitter-based drip systems practical for gardeners who are not irrigation engineers.
Honest limitations
The DRIPPAILQ kit is sized for containers and small setups — a patio with four to six containers or one small raised bed. For a full 4-by-8-foot vegetable bed or multiple beds in series, you will need additional tubing and emitters. Rain Bird sells expansion packs. The kit does not include a pressure regulator; if your house water pressure exceeds 60 PSI, adding a $10 to $15 inline pressure regulator is worth doing to extend emitter life.
The kit also does not include a timer. For automated watering, pair it with the Orbit B-hyve Smart Hose Faucet Timer — see the best hose timer guide for details.
What to look for in any drip kit {#what-to-look-for}
When evaluating drip kits beyond the Rain Bird, these are the features that determine whether a system works reliably over seasons:
Pressure-compensating emitters. Not all kits include them. Check the emitter description for "pressure compensating" or "PC." Without them, plants at different distances from the supply line receive different amounts of water.
Tubing material. UV-stabilized polyethylene tubing is standard and holds up outdoors for 5 to 10 years. Avoid kits with thin-wall tubing that cracks in cold weather. In zone 7a, pull tubing from beds before the first hard freeze (below 28°F) to prevent splitting.
Fittings quality. Barbed fittings that push into tubing are standard and fine for low-pressure drip. The connectors on Rain Bird and similar professional-grade systems are made to tighter tolerances than the cheapest imported kits — fittings that pull out under pressure create both lost water and dry plants.
Filter included. Even from a municipal supply, water carries enough particulates to clog emitter orifices over time. A 150-mesh inline filter at the supply line reduces clogging significantly.
Flow rate options. 0.5 GPH emitters for containers and small spaces; 1 GPH for standard raised bed plants; 2 GPH for larger plants or well-draining sandy soils.
Comparison table {#comparison-table}
| Rain Bird DRIPPAILQ | Generic Drip Kits | soaker hose | |
|---|---|---|---|
| Emitter type | Pressure-compensating | Usually non-PC | Porous wall (uniform) |
| Coverage | Containers, patio, 1-2 beds | Varies | Long rows best |
| Setup ease | Moderate | Easy to moderate | Very easy |
| Expandable | Yes | Sometimes | Limited |
| Price | $40-60 | $15-40 | $20-30 (50 ft) |
| Clog risk | Low (with filter) | Moderate | Low |
| Best for | Raised beds, mixed planting | Containers | Vegetable rows |
How to set up a basic drip system {#setup}
Per Clemson HGIC, the standard residential drip setup runs from a hose bib through a filter and pressure regulator, then into a supply line (1/2-inch), then out to distribution lines (1/4-inch) that feed individual emitters.
- At the spigot: Install a backflow preventer (required by most municipal codes), followed by a timer (optional but strongly recommended), a filter, and if your pressure is above 60 PSI, a pressure regulator.
- Supply line: Run 1/2-inch poly tubing from the spigot to the bed. Stake it to the ground.
- Punch emitter holes: Use the punch tool included in the Rain Bird kit to make holes in the supply tubing at each plant location.
- Insert 1/4-inch distribution lines: Run from the supply line to each plant. Stakes hold the distribution line end at the root zone.
- End the supply line: A figure-eight end cap or goof plug closes the supply line.
- Test. Run the system for 30 minutes and check each emitter is flowing. Clogged emitters can be flushed or replaced.
Per NC State Extension, most vegetable crops in raised beds need 1 to 1.5 inches of water per week during the growing season. With 1 GPH emitters and two emitters per plant, a two-hour daily run in hot weather delivers roughly the right amount. Adjust based on your soil type — sandy soils like the loam in Long Island's Nassau County need more frequent, shorter cycles versus clay soils.
Winterizing the system
Per Cornell Cooperative Extension, pull drip lines before the first hard freeze. Disconnect from the hose bib, blow out any standing water, coil and store indoors. UV-stabilized tubing stored out of direct sun will last 5 to 7 years. Emitters left outdoors through a hard freeze can crack.
Frequently asked {#faq}
Does drip irrigation work for in-ground vegetable beds, not just raised beds?
Yes. The setup is the same — supply line at grade, emitters at each plant. The advantage is even greater in-ground because emitters can be placed directly over the root zone of established plants. Per UC ANR, in-ground drip for vegetable production is used commercially at scale precisely because it limits water to the plant root zone and keeps interrow soil dry. At home, the main adjustment is anchoring the supply line more securely in-ground to keep it from shifting.
How many emitters do I need per plant?
Per Clemson HGIC, one emitter per small plant (lettuce, herbs), two emitters per medium plant (tomato, pepper, cucumber), and two to four emitters per large plant or tree. Place emitters 6 to 12 inches from the stem, not directly against it, to wet the lateral root zone.
Can I use drip irrigation for a container garden?
Yes, and it is one of the best applications for drip because containers dry out fast and benefit most from consistent moisture. The Rain Bird DRIPPAILQ kit is specifically designed for container and patio applications. Per UC ANR, a 0.5 GPH emitter running for 15 to 30 minutes daily is usually adequate for a standard 10 to 15-gallon container in summer. Adjust based on container material (terra cotta dries faster than plastic) and weather.
Does drip irrigation require a filter?
Per NC State Extension, yes — even on municipal water. A 150-mesh filter (included in the Rain Bird kit) traps particles that would otherwise clog emitter orifices. Clean the filter screen monthly during active use. In areas with high mineral content (hard water), flush the filter more frequently and inspect emitters for calcium deposits.
Can I connect a drip system to a rain barrel?
Yes, with caveats. Rain barrels typically produce only 5 to 15 PSI of pressure (from gravity head). Per Clemson HGIC, standard pressure-compensating emitters require at least 15 PSI to operate correctly. A rain barrel system may not reach that threshold without a small booster pump ($25 to $50). Non-pressure-compensating emitters with larger orifices (2 GPH or higher) are more tolerant of low pressure.
—-
Sources
- University of California Agriculture and Natural Resources — Drip Irrigation for Home Gardens
- NC State Extension — Drip Irrigation for Home Gardens
- Clemson HGIC — Drip Irrigation
- University of Florida IFAS — Drip Irrigation for the Home Landscape
- Cornell Cooperative Extension — Home Gardening